
Easily remove your Whirlpool oven door with this simple guide! Learn the straightforward steps to detach and reattach your oven door safely, making cleaning and repairs a breeze. This guide is perfect for beginners and offers a stress-free way to tackle this common kitchen task.
Have you ever needed to give your oven a really deep clean, only to find the door is, well, in the way? It’s a totally normal kitchen moment, especially with a Whirlpool oven. That big, beautiful oven door can feel like a puzzle when you just want to get to those tough spots.
But don’t you worry! Taking off your Whirlpool oven door is actually a lot simpler than it might seem. It’s designed to come off, and with a few easy steps, you can have it detached in no time for a thorough clean or if you need to make a small repair.
This guide is here to break it all down for you, step by step. We’ll go through what you need, how to do it safely, and what to do once the door is off.
Let’s get your oven sparkling clean and working perfectly!
Table of Contents
- Why You Might Need to Remove Your Whirlpool Oven Door
- Safety First! What You Should Know Before You Start
- Tools You’ll Need for the Job
- Step-by-Step: How to Remove Your Whirlpool Oven Door
- Step 1: Prepare for Removal
- Step 2: Locate the Hinges and Locking Clips
- Step 3: Engage the Hinge Locking Mechanism
- Step 4: Gently Lift and Support the Door
- Step 5: Place the Door Safely
- Reattaching Your Whirlpool Oven Door: The Reverse Process
- Step 1: Align the Hinges
- Step 2: Re-engage the Hinge Locking Mechanism
- Step 3: Test the Door Before closing the door completely, give it a gentle push and pull. It should feel firm and securely attached. Open and close the door a few times to ensure it moves smoothly without any sticking or unusual noises. If everything feels good, you can now close the door completely. Tips for Cleaning Your Oven Door Now that your Whirlpool oven door is off, it’s the perfect time for a deep clean! Cleaning the door separately is much easier and more effective. The glass can be tricky, especially with baked-on grease. For stubborn spots, a paste made of baking soda and water is a fantastic, non-toxic cleaner. Let it sit for a while, then gently scrub away. For the inside of the oven cavity, you can use commercial oven cleaners (always follow their safety instructions carefully!) or the baking soda paste method. Don’t forget to clean the oven racks while everything is out. For a detailed look at cleaning an oven, you can check out resources like this from the U.S. Consumer Product Safety Commission on oven safety, which often includes cleaning tips: Oven Safety Tips. Common Issues and How to Troubleshoot Sometimes, things don’t go exactly as planned. Don’t get discouraged if you run into a small hitch. Most issues are easily resolved with a little patience. Here’s a look at common problems and how to fix them: Issue: The Door Won’t Come Off
- Issue: The Door Feels Uneven or Sagging After Reattachment
- Issue: My Oven Model Isn’t Like the Guide
- When to Call a Professional
- Frequently Asked Questions About Removing Whirlpool Oven Doors
- Conclusion
Why You Might Need to Remove Your Whirlpool Oven Door
There are a few good reasons why you might be looking to detach your Whirlpool oven door. Knowing why can help you feel more confident about the process. It’s usually for maintenance or cleaning, but sometimes it’s part of a small repair.
Think of it like taking the wheels off your car for a tire rotation; it’s a standard part of keeping things running smoothly and looking their best. This allows for deeper cleaning that you just can’t get with the door in place. Plus, it can give you better access if you’re ever troubleshooting a minor issue.
Here are some common reasons:
Deep Cleaning: Oven doors, especially the glass, can get really grimy. Removing the door allows you to clean between the glass panels if needed, or just get to every nook and cranny for a spotless finish.
Minor Repairs: If you notice a hinge issue or a problem with the door handle, removing the door can provide the necessary access to fix it.
Replacing Parts: Sometimes, a part like a gasket or even the entire door assembly might need to be replaced. Detaching the door is the first step in this process.
Moving or Storage: If you’re moving your oven or need to store it for a period, removing the door can make it lighter and easier to handle.
Safety First! What You Should Know Before You Start
Before we grab any tools, let’s talk safety. Your oven door can be heavier than it looks, and it’s crucial to handle it carefully to avoid injury or damage. We want this to be an easy fix, not a workout with unexpected consequences!
Always ensure the oven is completely cool before you begin. Never try to remove the door while the oven is warm or hot. Make sure you have a clear workspace and won’t be interrupted.
Most importantly, if you feel unsure at any point, it’s always a good idea to consult your oven’s owner’s manual. If you don’t have it, most Whirlpool manuals can be found online on the official Whirlpool website. They often have specific instructions tailored to your exact model.
Here are a few key safety points to keep in mind:
Cool Oven Required: Absolutely no exceptions! Wait until the oven is completely cool to the touch.
Support the Weight: Oven doors are heavy. Have a helper if possible, or be prepared to support the door’s weight yourself as you detach it.
Clear the Area: Make sure you have plenty of space to work and to place the door once it’s removed.
Use the Right Tools: Using improper tools can damage your oven or lead to an accident. Stick to the recommended tools for the job.
Consult Your Manual: Your oven’s manual is your best friend for model-specific details.
Tools You’ll Need for the Job
Gathering the right tools beforehand makes the whole process much smoother. You don’t need a full mechanic’s toolkit for this, just a few common household items. Having them ready means you can tackle the job efficiently without stopping to search for something you’re missing.
Most Whirlpool oven doors use a hinge system that requires a simple screwdriver. Sometimes, a pair of pliers or even a small pry tool might be helpful, depending on the specific clip or mechanism.
Here’s a list of likely tools you’ll need:
Screwdriver Set: You’ll likely need a Phillips head screwdriver, and possibly a flathead screwdriver. The size will depend on the screws used on your oven’s hinges.
Helper (Optional but Recommended): An extra pair of hands can be invaluable for supporting the door’s weight.
Cardboard or Blanket: To place the removed door on to protect it and your floor.
Pliers (Optional): Sometimes useful for gripping small clips or parts, though not always necessary.
Towels or Rags: For cleaning around the hinge area or the door itself.
Step-by-Step: How to Remove Your Whirlpool Oven Door
Alright, let’s get down to business! Removing your Whirlpool oven door is usually achieved by disengaging the hinges. Each Whirlpool model might have a slightly different hinge mechanism, but the general principle remains the same: loosen screws, disengage the hinge, and support the door.
We’ll walk through the most common method. Remember, if your oven looks a little different, check that manual!
Step 1: Prepare for Removal
First things first, make sure the oven is cool and unplugged or the circuit breaker is off for extra safety. Open the oven door fully. You’ll want to see the hinges clearly at the sides where the door meets the oven frame.
Clear any obstructions from the oven racks and interior. You’ll need space to maneuver the door once it starts to detach. Have your helper ready if you’re using one, and place a sturdy, flat surface like a piece of cardboard or a thick blanket nearby to lay the door on later.
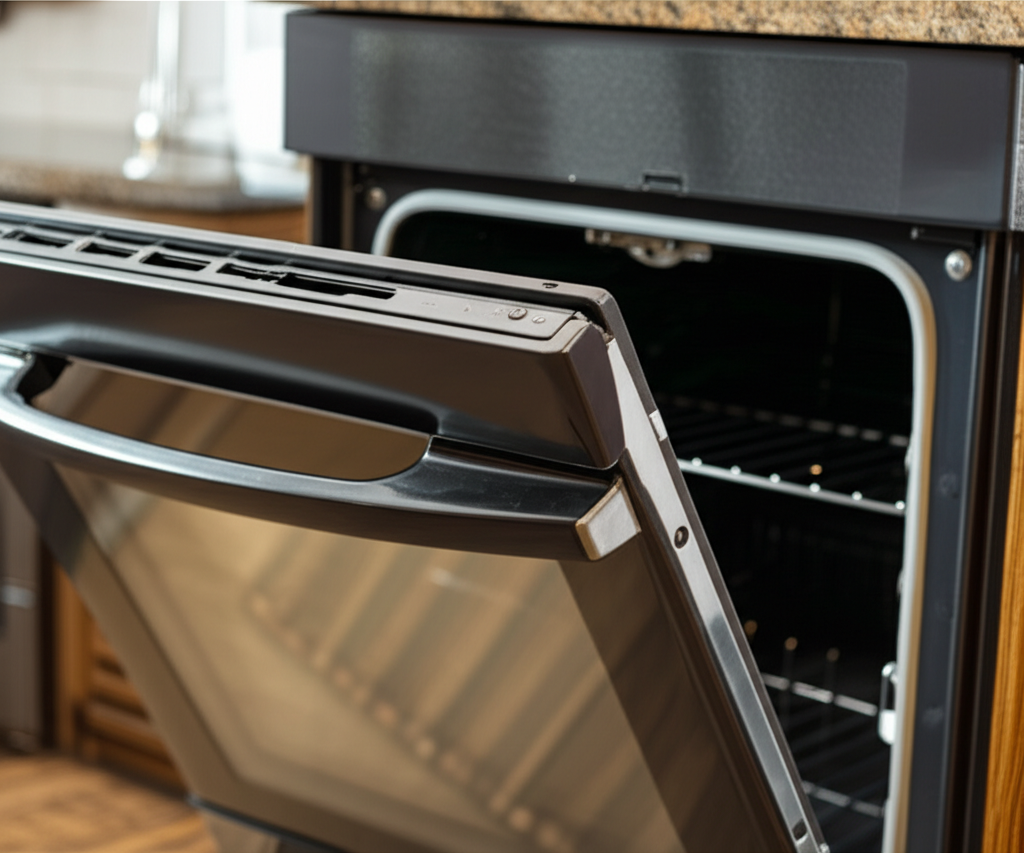
Step 2: Locate the Hinges and Locking Clips
Look closely at the sides of the oven door, near where it opens. You should see the hinges. On newer Whirlpool models, these hinges often have a small locking clip or tab designed to keep the door securely attached during normal use.
These clips are the key to removing the door. They prevent the hinge from swinging freely when the door is closed. You’ll need to disengage these clips before you can lift the door off.
Step 3: Engage the Hinge Locking Mechanism
This is the most crucial step. With the door open, examine the hinge mechanism. You should see a small lever, clip, or tab on each hinge.
For models with clips: You’ll typically need to push this clip towards the oven body or upwards to disengage it. Sometimes, you might need to use a flathead screwdriver to gently push it into the locked position.
For models with levers: There might be a lever that needs to be flipped or rotated.
For screw-based hinges: Some older models might simply have screws holding the hinge plate to the oven frame. You’ll need to partially unscrew these.
It’s often easiest to engage the clip on one side first. Your goal is to disengage the hinge so it’s no longer locked into the oven frame.
Step 4: Gently Lift and Support the Door
Once the locking clip or mechanism is disengaged on both sides, the door should feel freer. Now comes the part where you’ll need to support the weight.
With a helper: Have your helper grip the sides of the door firmly.
Solo: Grip the door tightly with both hands.
Slowly and carefully begin to lift the oven door upwards. You are essentially lifting it off the hinge pins that were attached to the oven frame. It might take a gentle wiggle, but don’t force it.
If the door doesn’t come off easily, double-check that you have fully disengaged the locking clips on BOTH hinges. Sometimes one side might feel looser than the other due to the angle.
Step 5: Place the Door Safely
Once the door is free from the oven, carefully lower it onto your prepared surface (the cardboard or blanket). Ensure it’s positioned so it won’t roll or get damaged.
Now you have it! Your Whirlpool oven door has been successfully removed. You can now proceed with cleaning your oven interior, cleaning the door itself, or making any necessary repairs.
Reattaching Your Whirlpool Oven Door: The Reverse Process
Putting your Whirlpool oven door back on is essentially the same process, just in reverse. Take your time, and make sure each step is done correctly to ensure the door is securely attached and functions properly.
It’s especially important to get the hinges re-seated correctly to prevent sagging or misalignment.
Step 1: Align the Hinges
Carefully pick up the oven door, holding it by the sides. You’ll need to align the hinge arms on the door with the corresponding slots or hinge pins on the oven frame.
This can be a bit tricky, especially if you’re working alone. Try to get one hinge lined up into its slot first. Lift the door slightly to make sure it’s positioned correctly.
Step 2: Re-engage the Hinge Locking Mechanism
Once the hinge arms are seated in their slots, you need to secure them. This is the opposite of how you removed them.
For models with clips: You should hear or feel a click as the hinge locks back into place. You might need to gently push the door inward slightly for the clips to fully engage. Make sure both sides are securely locked.
For models with levers: Rotate or flip the levers back to their original locked position.
For screw-based hinges: Re-tighten the screws that hold the hinge plate to the oven frame.